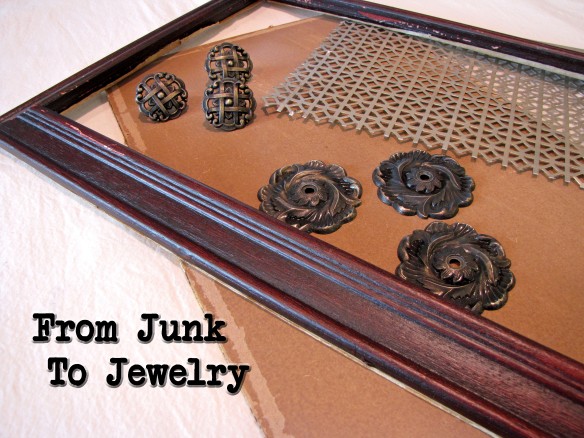
 Having a teenage girl has definitely made me think more about jewelry than I have for a long time. I used to care about jewelry when I was still dating……a million years ago, but now I think my husband is just glad if I show up clean and not smelling of paint. To be completely honest, he’ll still take me out dirty and smelly but only because he doesn’t have many other offers……..not that I do. Anyway, back to the jewelry. I got an idea for a hanging jewelry organizer when I was rummaging through my junk and I thought I’d share the steps I went through to create it, just in case you have some junk laying around too…..oh, and some jewelry. In the above photo you can see what I started with. The frame and back board were originally together as a piece of “art” from Ross. The “art” was ugly so I pulled it out and used the back. I bought it at an estate liquidator place for $5, which is high (I think the guy thought it was “art” too) but he gave me two others for $1 so I’m telling myself I paid $2 for it. Ah, the rationalizations of the hoarder mind. The ugly metal knobs are in two pieces and I found them at a thrift store for 50 cents each. I think the metal screen is used for radiators, but since we don’t have those in San Diego, that may be an urban legend. I found it in my friend’s garage and she let me take it for free. Yay!
 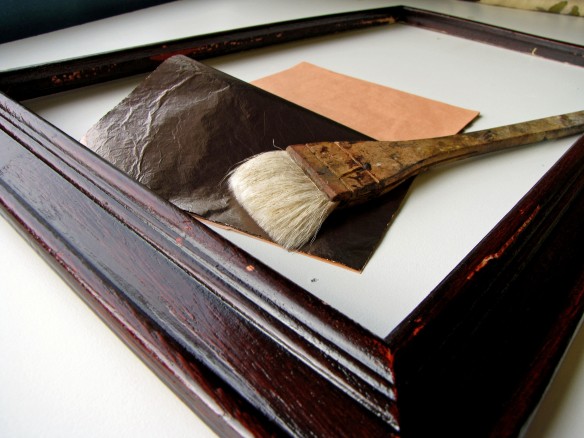 I decided to gild the frame with metal leaf. The first step in gilding is applying gilding size and I always use Rolco Aquasize which is water-based and dries quickly. Gilding size is a watery adhesive that you brush on. The photo above shows the frame after the size was applied, which is why it’s shiny. The metal leaf I used is called Celestial Leaf and the color is Moonbeam. This is a variegated metal leaf, so the color is inconsistent, which I actually love. Celestial Leaf comes in books and each sheet is applied individually.
 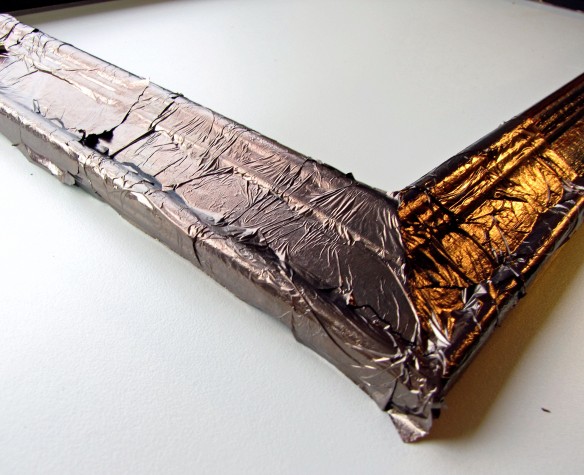 After the size has dried and become tacky, lay a piece of leaf on the surface and push it in to the crevices with a soft brush. Try to not touch the leaf with your bare hands as the oil from your hands can discolor the leaf. When you have the entire surface covered in leaf, smooth it out with a sheepskin pad. If you don’t have a sheepskin pad you can use a really soft rag, but just know that it may scratch the leaf if it’s not truly soft.
 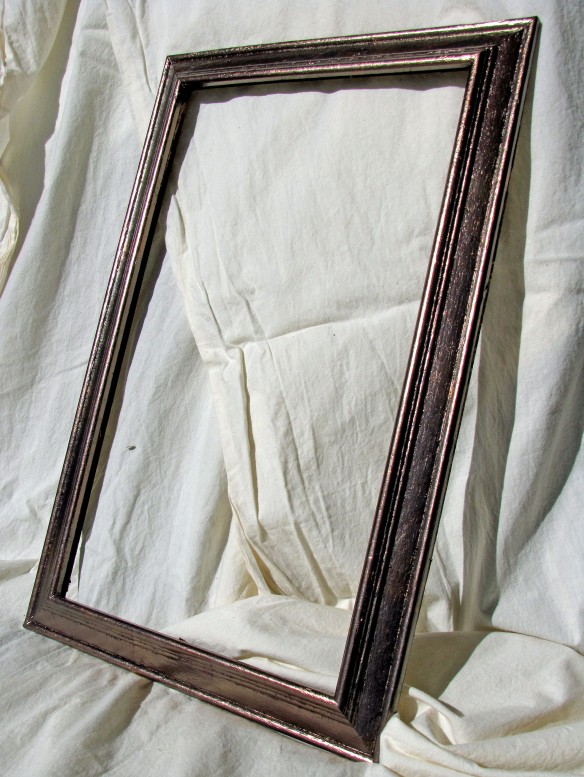 When the leaf is all shiny and pretty you can spray a coat of varnish on it to protect it from tarnish. I really recommend this step if it will be hung near a shower.
 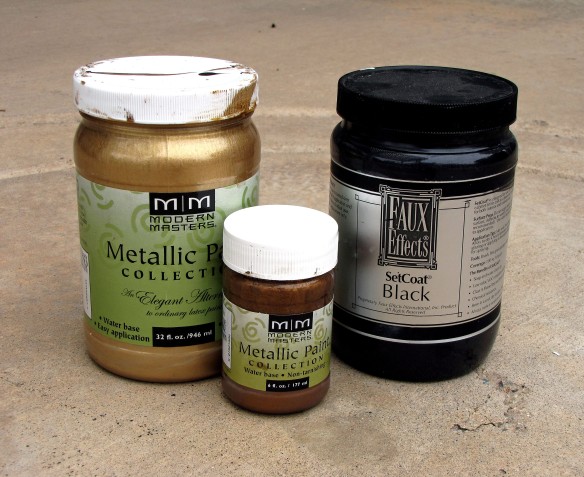 Moving on to the knobs….after cleaning them well, I primed them with Faux Effects Black SetCoat, but you could use any metal primer that works with water based paint. I painted them first with with one coat of Antique Bronze metallic paint from Modern Masters and then a second coat in Pale Gold.
 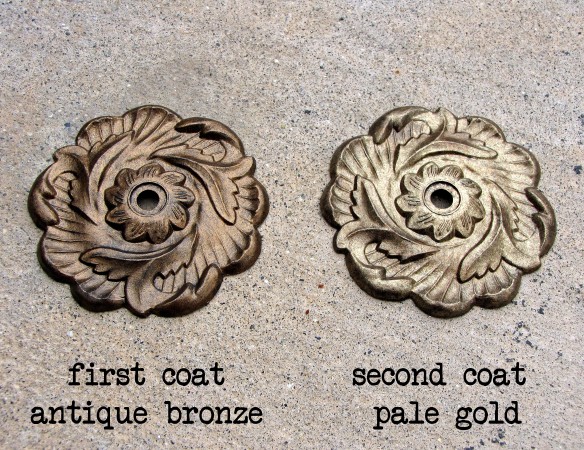 Metallic paint can be fairly transparent which is why I used a black primer. I stippled (fancy word for blobbing on light layers of paint) a thin coat of each color with a small, badly, crumpled artist brush. Use a bad brush so that the pattern is irregular. Smooth brushes leave streaks if you just brush on metallic paint. You can get a better look by stabbing it on randomly, while allowing a little of the black primer peek through.
 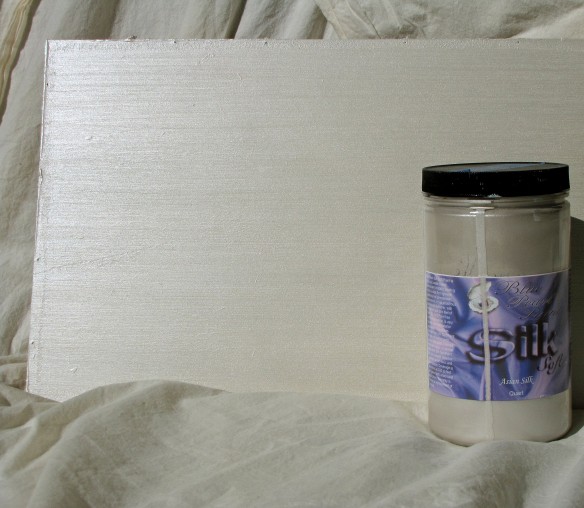 Now for the fun part; the backboard. I sanded the board to get rid of scratches but it was still a little uneven. I decided to hide the blemishes by using this Blue Pearl paint called Silk Soft, in the color Asian Silk. This is a metallic paint that actually has small fibers in it making it thicker and textured to the touch. To amplify this effect I applied it heavily with a rough chip brush in one direction. It looks very much like raw silk and it’s a great background for the next step.
 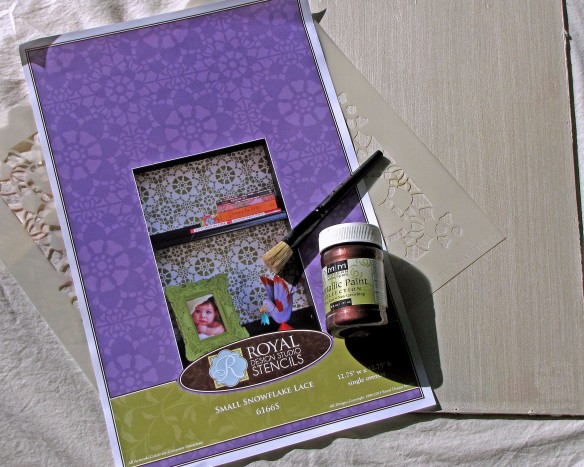 I used a new stencil from Royal Design Studio called Snowflake Lace. Royal Design just released a whole group of lace stencils that are really fun to use. I used Modern Masters metallic paint in Black Cherry and a brush from Royal Design Studio. Please don’t consider doing this with anything other than a stencil brush. Sponge brushes and artist brushes suck and should never be used for stenciling. You can use them, just don’t call me crying about it when it’s hideous. I told you not to use them. Dip your brush lightly in the paint, then rub off the excess paint in a swirling motion on a paper towel until there’s barely any paint on your brush. Swirl your brush lightly on the edges of the stencil openings, working your way into the center of each opening. Lift the stencil to check your progress as you go. It takes very little paint to leave an impression.
 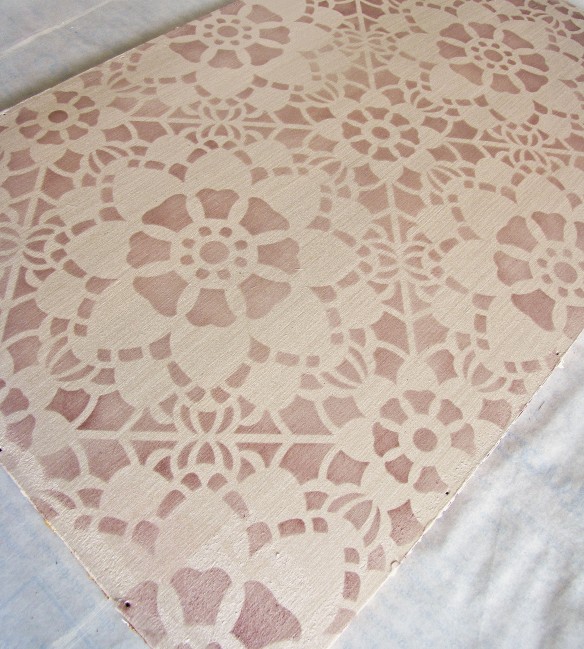 Do you see any blobs of paint? Any ooze under the stencil? No? That’s because I used a proper brush and a very light amount of paint. It’s not rocket science. Just use the right brush for the project, and don’t go heavy with the paint.
 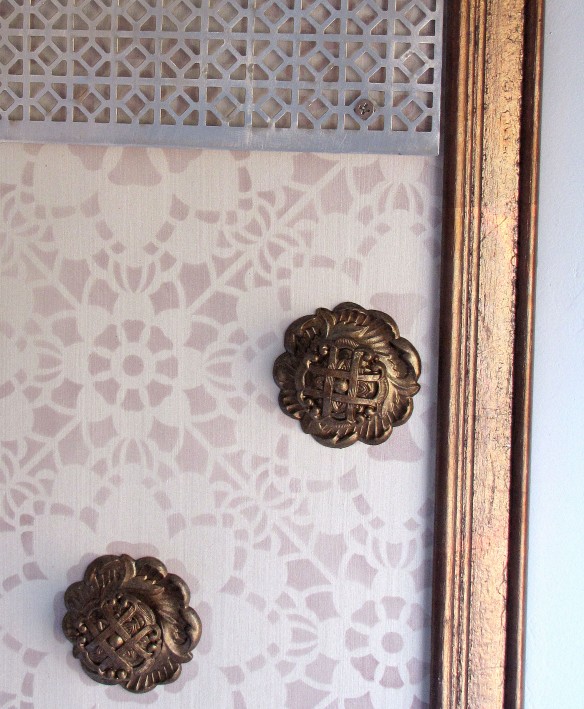 When all the pieces were painted and pretty I put them together. The metal screen didn’t need to be painted, I just sanded off the dullness before attaching it to the backboard. The screen and the knobs were attached with bolts after I drilled holes in the board.
 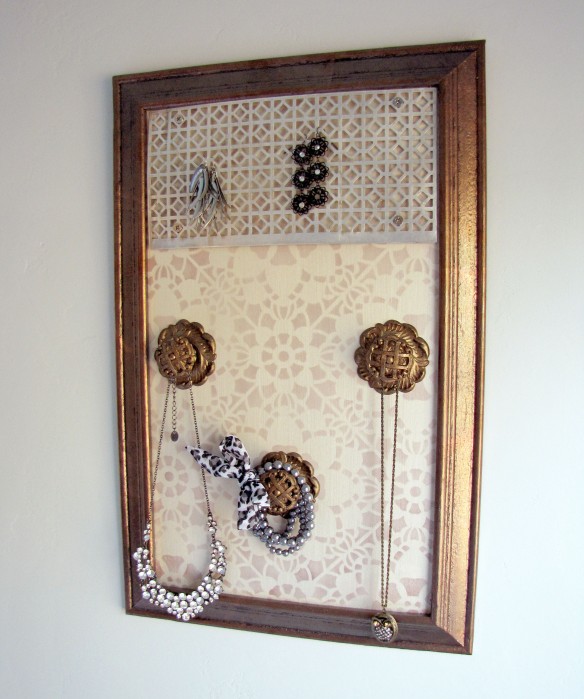 So from pieces of junk I created a great place to organize jewelry. I love how it all came together. It’s for sale in my Etsy shop now if you know anybody that could use a little help with corralling their accessories. This was so fun, I may have to make another one. Inventory used: Metallic paint
Category Archives: decorative painting
Stitched and Painted Bird Art
 I’ve been collecting all sorts of ideas for art gallery vignettes that I want to create in my home before we leave. The idea for this little beauty came from an article in Sew Somerset magazine that I pulled out over 18 months ago. I rip articles out that I like and keep them in binders in clear plastic pockets so that the rest of the magazine can be recycled. I recently confessed this behavior to a woman I chatted with at a bookstore. She said that I’m way too organized, but I think it sounds a little better than the hoarder house full of hundreds of magazines that she lives in. I don’t want to be found two weeks after I died, trapped under 10 year old craft magazines…….that would be so embarrassing.
 This article was written by Colette Copeland who writes on a blog called a-bird-in-the-hand. I was taken in by the simple shapes, the single word, and the idea of outlining the image with hand stitching.
 I decided to use this frame that I picked up for 50 cents at an estate sale. The gold painted edges were dinged up and it had no back or glass, just a slot for a really thick image. I fixed the edges really easily with gold acrylic paint.
 Since the slot for the image was so deep I decided to paint it on a piece of an old book cover that was too broken to be used for anything else (Don’t ask me why I keep crap like that and don’t think I don’t know that you’re picturing me right now, dead under a stack of broken book covers, just stop it!). I sketched the outline first and then filled it in with watered down acrylic paint. When it was dry I poked holes with an awl all the way around the outline. I stitched the outline with pink embroidery floss using a backstitch.
 I framed a doodle stitching piece (my first ever) in another gold frame I found at the same estate sale, and hung both of them with vintage pink ribbon. I put eyelets in the ribbon to make them easy to hang. They flank the collage piece that I made at the Spellbound Art retreat in November. I love this piece so much, but I had nothing else in this color scheme in my house, so I decided to make something to coordinate with it and that’s how this little grouping came about. I’m working on a bigger piece that I started at Spellbound for the opposite wall and I’m really excited about finishing it. I like these pieces because they’re so different from anything I’ve done before. I’m loving the freedom I have right now to try new things.
The three of them look great together, especially on the mottled, taupe, Venetian plaster in my guest bath. I did the plaster years ago and until now there hasn’t been any artwork in there. Mostly because Venetian plaster is hard to repair so I didn’t want to hang anything unless I was in love with it. There’s no poking holes, just willy-nilly when it comes to plaster, at least not in my house. The collage is light enough to be hung on a 3M adhesive hook but the two side pieces I hung on Monkey Hooks that only leave pin size holes, which shouldn’t be too hard to touch up………but only because I’m so awesome.
Inventory used: acrylic craft paint
A Peaceful Bedroom
 My daughter chose a color palette of powder grey, lavender and sky blue for her bedroom’s last makeover. As I mentioned earlier, this would be the fourth makeover since she was five. She’s nearly 18 now and wanted to make her surroundings peaceful and serene. The challenge in redoing this room was that the third makeover had made the walls extremely difficult to paint.
 This was what I had to cover up. I had at least been smart in that only water-based products had been used on the walls. I had even found water-based Sharpie paint markers so that the writing wouldn’t bleed through the next layer. The biggest problem was covering up the paper images. Apparently, I really glued those things down. So rather than try to remove them, I decided to plaster over them. I have several gallons of various plaster products in my Stash and this was a great opportunity to use them. I’m not going to tell you what I used because they can’t be bought by the general public, and I didn’t use them the way they were supposed to be used and I really don’t want to give you people any ideas.
 This is what I call “artistic experimentation.” I troweled on different products until I found one that gave me the look that I wanted. I ended up giving the walls a skip-troweled finish which I love. It took me a week to get the walls plastered and even. Once it was sanded and level we finally got to paint.
 My daughter is still not ready to let go of the Whomping Willow mural I painted two makeovers ago. It originally looked like this:
Then I transformed it to this:
 The idea was to make the mural look like an advertising poster for the Harry Potter exhibit opening at Universal Studios in 2010. One mistake I made was stamping those designs in the corners. I didn’t think about what the ink was made of and when I tried to plaster and paint over them, the ink kept bleeding through. It took about 5 coats, no kidding.
 I didn’t like the raw plaster edges around the mural so I ended up cutting wood trim and attaching it to the edges. The bottom piece of trim actually has a small lip like a ledge. I faux finished the trim to match the mural, added some trompe l’oeil details to the top corners and lightened up the color of the frame so that it complements the wall color better. I’m really happy with how it came out.
 We really lucked out on the day we went shopping for curtain fabric. We went to our local DAV thrift store and these sheets were just sitting there, along with a lavender sheet that I used as a dust ruffle.The curtains were cut from one twin size sheet and one queen size. I lined them with two plain white sheets to block out more light. I think I spent less than $20 on all the fabric. The rods and rings are from Target. I made the tie backs from lace, ribbon and fabric snaps out of my sewing stash. I absolutely love how these look on the windows.
 My daughter got rid of a lot of stuff so that the walls would be sparsely decorated and less busy. This is the first room in the entire house that I haven’t added pattern to the walls in one form or another. It’s a new experience, but I think I love it.
Inventory used: 1 gallon faux stone
The Evolution of a Girl and her Room
My daughter and I just finished making over her room for the fourth and final time (whew!). Her room has had more ideas splashed on its walls than any other room in the house. I swear her room has decreased in square footage from all the plaster and paint we’ve added over the last 12 years. Each makeover reflected her growth and her latest and greatest dreams. I’ve loved trying to bring her ideas to life and it’s been worth every bruise and back spasm to give her a space that’s all hers.
 Our house was a model home, so when we moved in, her room had already been given a theme – butterflies (the caterpillar came with the room as well). I can’t even believe how little she was when we first got there.
 The paint job had been poorly done so we repainted it with a slightly different palette and expanded on the butterfly theme to include all sorts of insects (those butterflies came with the room as well). Dianna was a tomboy and wanted more bugs than beauty so we added ants and spiders to keep it from being too precious. The fun part was having my paint friends come help. We figured out how to do raised stenciling and then we added little jewels to the wings for a little sparkle. So totally fun!
I searched forever for pictures of the raised stenciling and all I’ve figured out is that they’re gone and this computer is refusing to do anything with the pile of negatives I have in a shoe box. I’ve tried cramming them in the disc drive, but my husband says that’s not good for the computer. Negatives! Can you even remember those?
 In 2003 I was fully entrenched in my faux finishing business and had been introduced to a product that created a stone-like finish in two easy steps. That sparked the idea for a Harry Potter themed room. We’re both huge fans (friends will tell you that huge does not describe our obsession accurately) of the books and the movies, and had traveled to Oxford, England just to visit some of the spots where the movies were filmed. I incorporated some of the architectural elements into the room including a carved window looking out toward the Whomping Willow (she has kept this mural through all the other makeovers).
 The room reflected Dianna’s love of dragons and magic without going to that girly side where glitter and unicorns usually spring up. Most of her friends were boys at this age so a feminine room would have been less than inviting. Thankfully all the work we put in to this room was rewarded by her loving it for six years……an eternity in kid-time.
 2009 was the year she decided to move on. She was loving rockers like Hayley Williams, Avril Lavigne and Green Day and the Potter room just wasn’t working any more. She really didn’t know what she was looking for, but she knew she wanted it to be dark. We dove in to that makeover with a gallon of nearly black paint. It was awesome.
 We experimented with spray painting through stencils and a lot of metallic foil. The foil guitar image was one of Dianna’s own designs and gave the room a focus wall.
 After wallpapering photos, maps and posters everywhere, we decided to let her and her friends fill in the blank spaces. So one afternoon I taught 5 junior high boys how to stencil, gave them paint and brushes and then let them all go. They created a graffiti masterpiece. I think the boys’ mothers thought I was crazy, but that really was one of the funnest things we’ve ever done and I know Dianna will never forget it.
All through high school Dianna’s friends added to the walls whenever they were inspired. It was like living inside a yearbook with all your friends’ comments and inside jokes. I kept the base colors in little cans so she could subtract things like old boyfriends or bad memories….you can paint over almost anything.
This summer Dianna decided she needed a change. Heading in to her senior year was moving a little too quickly. With friends leaving and her trying to figure out what to do after graduation, she was feeling the need for a small refuge from all the changes going on outside. The graffiti and the darkness of her room seemed to be dragging her down and she was searching for calm and light.
The graffiti room had a lot of stuff that had to be removed, patch and plastered. It was definitely a suck job and I’ll tell you all about it some other day, but for now, just know that Dianna finally has some peace, and a quiet place to slow down in.
But Wait! There’s More!
 The above photo is of the completed ceiling medallion that I delivered to my client on Monday. They loved it!
Then on Tuesday they called and although they still “loved it,” they wished there was more of the aluminum leaf. aka: not actually loving it.
This is one of the reasons I quit working with clients. It’s not their fault. I’m just one of those people that loves to check things off a list and be done with it. To get a call for a change when I’ve put everything away and moved on to the next project just makes me crazy. What’s worse is that I can’t say no because I can’t stand for people to be unhappy with my work. So all the materials came back out and I went back to work. Grrrrrrrrrr.
 We agreed on adding more aluminum leaf to the flowers and the centers of the teardrop carvings. I actually think it’s a huge improvement.
 So here’s the final, FINAL ceiling medallion. They love it…….at least until tomorrow.
How-To Paint a Ceiling Medallion
 I have always wanted to paint one of these decorative ceiling medallions and last week an old client of mine handed me an unfinished one simply asking me to “do my magic.” I was all over it.
 If you haven’t seen these you can find them almost anywhere that sells lighting. This one came from Home Depot and is made of foam. They come primed and ready to paint.
 I chose to use Modern Masters metallic paint in the color Brass which coordinates with the other fixtures in the room where this will be installed. The glazing brush I’m using came from Pierre Finkelstein’s collection and is perfect for getting into the nooks and crannies on this piece.
 Metallic paint will show brush marks if you try to simply brush it on, making it look streaky. It’s best to use a stippling, pouncing motion to not only get the paint in the crevices but to also give the paint a more even finish. This paint is a little transparent so it required three coats.
 When the three coats of brass were on I painted the inside and outside rings with two coats of an off white latex paint. The latex was in a satin finish which is important because I planned on glazing it. If I had painted it with craft paints or matte latex the glaze wouldn’t work properly and the piece would end up too dark and splotchy.
 The chandelier that will hang under this medallion is chrome and glass, so I decided to add aluminum leaf on one part of the molding and on a couple small pieces on the inside carving. The first step in applying leaf is applying a liquid size which is very runny so I taped off the ring to prevent the size from dripping where I didn’t want it to go.
 I use Rolco Aquasize because it’s water based and dries faster. Traditional oil-based size takes forever to tack up. I buy the metal leaf from Royal Design Studio, which is really close to my house and has a great selection. You can buy online from them as well.
Apply the size in thin layers with a soft brush. The size is the consistency of water so there’s really no way to put on a thick coat. It takes 25 minutes to dry and get tacky. If after 25 minutes it’s not tacky enough, put on one more thin coat.
A quick note on metal leafing: True metal leafing is an art form that takes years to master and pristine tools and environments. What I’m describing here is what I call Crafter’s Leafing. I’m just gluing on shiny metal. I’m breaking every rule of leafing, and I’m fully aware, so there’s no need to point it out.
 Metal leaf comes in square sheets and is lighter than air, so don’t do this outside or near an open window, or while you’re blow drying your hair. Simply lay a piece of leaf over an area with size. It will stick immediately.
 I used a small soft brush to press the leaf into the crevices. Don’t press it with your fingers because the oil on your hands can discolor the leaf.
 When all the leaf is on, burnish or rub softly with a sheepskin pad. This will even out the sheen and remove any little flakes lying around.
 If there are places where the leaf is missing, it just means you missed a spot when you were applying size. That’s easy to do when working with light colors because the size is transparent. Apply more size to the spot and add leaf when it’s tacky. It will blend in when you burnish it.
 After I burnished the leaf I noticed that it had left grey smudges along the edges. I touched it up with the latex paint before moving on to the next step.
 I wanted to age the whole piece so I mixed up a very dark glaze and applied it heavily in small sections. Don’t glaze the whole piece at once or the glaze will dry before you can rag it off.
The glaze I use isn’t readily available to DIY people, but if I could give you a recipe I would tell you to go to an art supply store and pick up Golden’s Acrylic glaze and Van Dyke Brown fluid acrylic. I would mix one part pigment to six parts glaze. Always test it before slopping it on the whole piece.
 Once you get the glaze on a section, remove it from the high points with a soft rag. Leave the glaze in the crevices.
 I use a soft hake brush to stipple the glaze in the low flat areas. It evens out the glaze, blends it with the adjoining section and gets rid of smears. Work in small sections around the piece, glazing the outside molding last. Acrylic glazes take 24 hours to dry completely and may take even longer where the glaze puddles in the crevices.
 I love how the glaze settled in the outside molding. It took just enough shine off the aluminum leaf to make it pretty and not garish.
 So there it is. I’ll post a picture of it when it gets hung with the chandelier. They’re really happy with it and I had a lot of fun painting it. Now it’s your turn!
A small note: this didn’t end up being the final product thanks to the client’s wanting more metal leafing. Please go to this post to see the real final product.
Creative Wood Repair
Okay, so I haven’t posted anything for two weeks. It’s not because I’ve been lying on the couch, watching General Hospital. Is that even on anymore? Anyway, I’ve been working on a decorative painting job, which is something I don’t do anymore, unless you’re my favorite client, and unless I feel artistically obligated, and I happen to really need some extra cash.
Mystical forces converged and caused a slab leak in my favorite clients home, which caused the kitchen to need removal, which caused damage to all the paintwork I had applied to his walls over 10 years ago, which caused him to ask me to come back and repair the damage to my work. So that’s where I’ve been.
 The first job at hand had nothing to do with flood damage. My client is a contractor and he came upon this large, beautiful wood carving in his client’s dumpster. He said it was in many, many pieces as it had been broken by the movers. His client didn’t think it was worth saving. My guy picked up all the pieces and put it back together but there were three pieces missing. I asked him to try to fill the holes as best he could and I would take it from there.
 So the grey parts in these pictures were made with a product that’s supposed to work like metal solder. Please forgive the grainy photos, it’s a dark house. His assistant tried to form the missing pieces out of this clay-like substance and then stuck it on. It was pretty rough but I guess the stuff hardens in five minutes so you don’t have much time to perfect it.
 I started by carving and sanding the pieces. Please understand that I had told my client I could faux finish the pieces, not carve them. But when I saw them, they needed a little help. Too bad all I had was an exacto knife and sandpaper. I decided to make lemonade.
 Here it is all finished. Can you find the pieces I fixed?
 So here’s the tip of the tail. The carving was difficult and I definitely could have used other tools. But I think most people won’t be able to pick out the non-wood dragon tail.
 These two repairs were easier and are a little hard to find. I think it turned out pretty well. He’s really happy with it.
I didn’t take pictures of the wall repairs because they’re not interesting. What is interesting is this house and this client. He’s the first person that ever hired me and doing his house was a total blast.
 There’s only two rooms in the whole house that I didn’t paint and they’re just bathrooms. He gave me free reign so I put birds, lizards and bamboo everywhere. It pretty much looks like Margaritaville, but he loves it.
 When he ran out of walls he added a stair railing he had a guy make out of random pieces of metal and then had me paint it.
 How cool is that?! I’m pretty sure this isn’t up to code, and that small children would definitely kill themselves here, but they don’t have any kids so it’s just fun.
 I was pleased to see that my work had held up so well, and to be completely honest, surprised that he hadn’t painted all of this out. I’m not saying it’s not good, I’m just saying I can’t believe he isn’t bored with it. I’ve painted my house three times since I did this.
 The other thing I worked on all week was turning this tan painted door into a mahogany door. I’m not great at wood graining, but I’m pretty happy with how this came out.
So anyway, I’m glad to be getting back to my new, normal life and off the job site. I miss my studio and my dog. How could I not?
Office Supply Organizer
 I picked up two of these little boxes at Matilda’s Mouse sale in December. They look like leather boxes, but they are actually made out of cardboard with a faux leather covering. I have no idea what they were made for, but I just loved all the little boxes in the drawers.
I did think they could use a little freshening up though. I just new some fresh paint would liven them up.
 This one I stenciled an Asian inspired design from Royal Design Studio. I also used Royal Design Stencil Cremes because they’re my favorite paint to work with right now. The paints I used are metallic and show up brilliantly on black backgrounds.
 I used the same paints on the second box, but a Martha Stewart stencil, mostly because it fit easily on the box. Here you can see the little boxes inside the drawers.
They’re both for sale at my Etsy shop for anyone looking to get their work space organized. I just reorganized my shop with new photos so please visit when you get a chance. Happy New Year!
Inventory used: metallic paint
Side Table Makeover – Dated to Dateable
 Dateable? Can you date a piece of furniture? Is that even a word? Spellcheck says no. I suppose you can’t date a table, but think of it this way…. “Nice side table. I wouldn’t mind seeing it again. Maybe I want to take it home and introduce it to my family. Maybe I want to see it every day for the rest of my life!” Okay, I may have gone too far.
This little table is a quality piece of furniture manufactured at Heritage Furniture. The original finish was a little boring but I loved it’s little copper patina feet.
 I painted the base a nice vanilla color, and left the little feet as is, but the real artistry went in to the top.
 I covered the wood table top in a concrete like product topped with a solid epoxy. This product is designed to be used as a countertop so it’s incredibly durable. The artwork is sandwiched between the concrete and epoxy and was created with stencil impressions from Royal Design Studio. This table top won’t chip, stain or peel off, and can’t be ruined with drippy waterglasses.
I think the overall look is a little French. It’s being offered for sale at the destashio Etsy shop. Wouldn’t you love to bring it home to mother?
Inventory used: grey and pearl acrylic craft paints in the artwork
Built In Desk Makeover – Days Three and Four
 Sorry this took so long to finish. I swore to myself that I wouldn’t sugar coat what my process is even if it goes down the wrong path, twice. Let’s just say there were issues with the top coat.
I decided to top coat this with Sherwin-Williams Wood Classics Fast Drying Oil Varnish. The first mistake was that I picked up a can of high gloss instead of satin and didn’t realize it until it was already on the piece. I’m not a lover of shine so it was a drag, but I figured that I could sand it back with steel wool which was true.
Maybe I should go back and say that the first mistake was buying the Fast Drying Oil Varnish. Fast should be replaced with “So fast you should just pour this crap on”. Top coats are where everyone can and will screw up a great piece of furniture. Most people bite the bullet and start spraying their topcoats, and I’m very close to doing that. The reason is, most products that claim you can brush, roll or spray their products are lying to you. Let me rephrase this. You can brush or roll their product as long as you’re not attached to the piece and are considering leaving it out on the curb on trash day.
I actually have found a great top coat that I love called Arm-R-Seal Polyurethane and you can wipe it on with a staining pad and it’s phenomenal. However, this line of stain isn’t compatible with it, and since I’m trying to stay within my stash of stain I had to pick a different top coat.
Now back to the desk. This fast drying varnish sets up within 5 seconds. I’m probably being generous with the 5 seconds. So you brush on one spot then load your brush again and put it down and demurely let out an, “Oh, Shit!” when your brush touches the spot just adjacent (that you just laid down 3 seconds ago) and leaves a trail of scattered, bumpy, rumply varnish piles. And then you do it again, and again, and again. Thank God my daughter is completely oblivious to my potty mouth because there was nothing but swearing going on while I did this. The spots don’t go away either. It’s like mini sculptures of crap all the way along the surface.
Now some of you who think you know more than me are saying, “She should have thinned it.” Ok smartypants, but the can says DON’T THIN. And I’m a rule follower.
Needless to say, there was a lot of sanding taking place after it dried which left it more foggy than I like. The answer to that was finishing paste wax. Great product. Luckily I was going for a distressed look because it looks like it came from a library in London that was bombed in the war. I love that look.
 The handles are all cast iron which I have a thing for. My Dad owned a cast iron foundry when I was growing up so I appreciate the artistry. I won this set of five different handles in an ebay auction for $18. Total steal. I will faux finish the screws to match in a couple days, so don’t worry about the garish silver hardware.
So there it is…a simple desk makeover……..whatever.


