New Organization Tools

September is one of those months that I get really motivated. September and January I end up doing Spring Cleaning, which I know doesn’t make any sense, but there it is. I recently made a few new message centers that I’m particularly proud of. They go along with my seasonal organization disorder.

perpetual-calendarThis dark one has what I call a Forever calendar at the top. I’ve also heard them called perpetual calendar. The idea is, you write in the dates for each month with a dry erase marker. I left room around the edges so you have room to write other notes as well. I stenciled a calendar grid on canvas and hand painted the corners in grey and dark mustard colors. I installed it under glass in an old frame I picked up at an estate sale.

message centerThis organizer is pretty basic. It’s a calendar with IN and OUT file holders below. All the salvaged wood moldings are stained the same in a dark walnut finish.

mail holder out-boxThe vintage books I used are big enough to hold standard size file folders. The color palette is different but I think it works.

magnet board
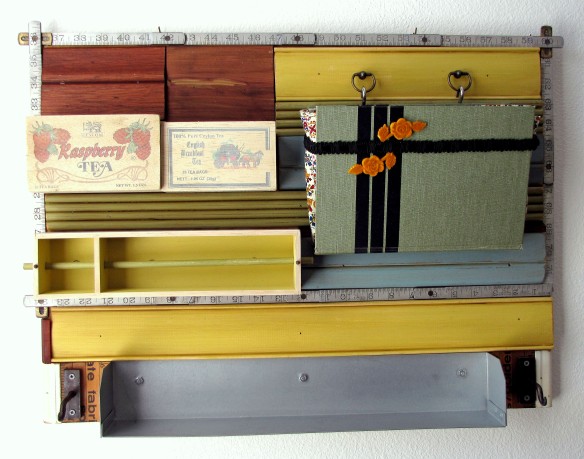
The other two boards I built are being sold as a set. The thing is, I had a bunch of pieces that I wanted together and I thought it would be too wide, so I split the board up. This gives the owner the flexibility to either hang them side by side or vertically, or in two completely different places.

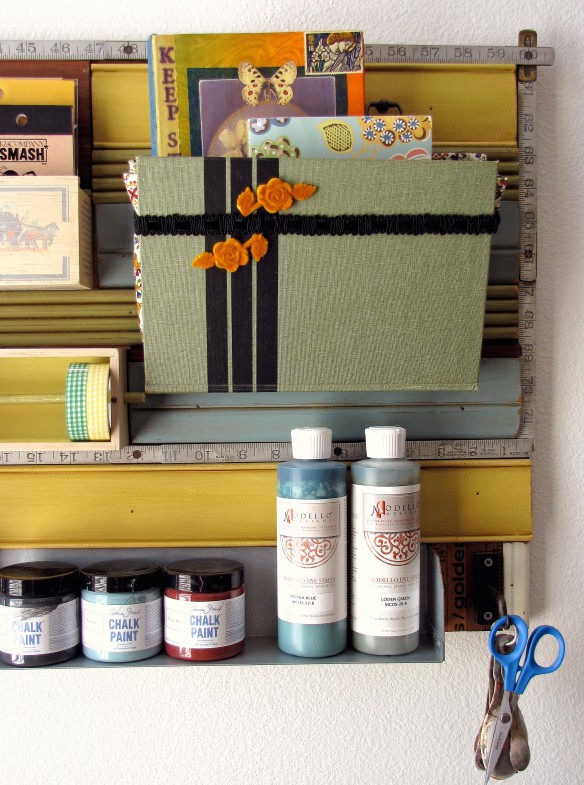
This first one has a large book that can hold file folders. Beneath it is a magnet board covered in a vintage fabric and sports two magnets made out of antique looking bottle caps. On either side of this are two clothespins attached to the board to hold invitations and reminders.

message center
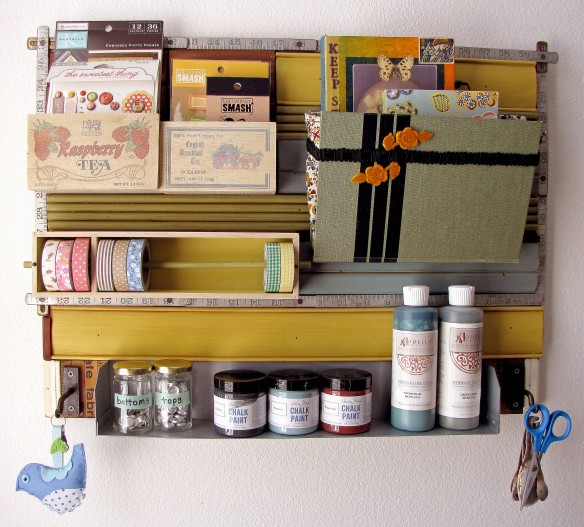
This message board has a dry erase board with vintage tablecloth fabric under the glass. There’s a tin for holding pens and pencils right where you need them. Under that is a small mail holder and a hanging frame.

Both boards are painted in high gloss white which is different for me, but I really like how it looks. All of these can be viewed in more detail at my Etsy Shop. Have a great holiday weekend.

Inventory used: latex paint, Stain & Seal

The Bathroom Remodel is complete

finished remodelThe remodel of my daughter’s bathroom is finally complete. The studio and the downstairs half of my house is clean and I’m finally at peace. Let’s visit the Before shots for a moment shall we……….

BEFOREI shudder just looking at this. This was the starting point of our unplanned bathroom remodel. In our defense, it was this way when we bought it. But at the same time…..it was this way when we bought it……12 years ago.

ugly bathroom BEFOREThat nasty piece of terry cloth has been hanging there for 12 freaking years! Some model home designer stuck it there in a stroke of brilliance and I chose to ignore it for over a decade. Amazing what one can deny exists in our own homes. Now back to the pretty pictures:

beauty centralFirst thing to go was the wallpaper, which sucked to remove because the walls hadn’t be primed and they installed it right on the drywall. The glue really wanted to stay on forever but we washed it over and over and over and then primed. Dianna went with a great shade of blue on the walls and bright white on the cabinets. We raised the height of the vanity and added some new hardware on the drawers and doors which I love.

wood countertopWe removed the old counter top and tile backsplash and replaced it with a solid wood top and a backsplash made from “clear wood” which I think is code for “plastic with a faux wood veneer.” It’s light weight and cheap but I bought it because I thought it would be a good choice considering the risk of water damage.

Both the top and splash were stained with a Faux Effects product called Stain & Seal and three coats of C-500, a urethane product also from Faux Effects.

Lace flowersI know it looks like I put stickers on the backsplash, but this is a painted detail I swear. I used a Martha Stewart silkscreen design to create this border. This is my first time using a silkscreen. What I liked about it was that I could use much thicker paint than with a stencil, creating a more dimensional design, which is why it looks like a sticker. My daughter loves lace and she chose the design. She also has a connection to my mother through daisies, so she loves having these around.

union jack organizerThis jewelry organizer, complete with Union Jack design is one of our favorite additions. I can not take credit for the design. My friend Melanie created this design on an old IKEA door for a photo shoot, but then didn’t need it afterward so I got to take it home. Being huge fans of all things British, we had to incorporate it somehow. Thanks Melanie!

the new Assmaster 2000The new Assmaster 2000 has been installed and is no longer being crowded by 12 year old terry cloth (so nasty). My daughter decided that a door to the shower area was stupid since she’s an only child and no one walks in on her. She opted for a curtain in the doorway instead. Kind of like a dressing room.

The photo above also shows off the new floor. It’s vinyl planks which are really easy to install and extremely cheap. They look really nice and give the look of wood without having to take out a loan.

cool teen bathroomWe removed the giant sheet of mirror and replaced it with two new mirrors. We paid $15 for each of them but they came with ugly dark brown frames. We made them over with high gloss white spray paint. I filled the gap between them with two shelves I made from the scrap piece of MDF left over from the new footer on the cabinet. We also made over the clock and the light fixture with the high gloss white and they look brand new.

remodel on the cheapSo that’s our little project. We did get rid of some paint and stain from The Stash which is always good. Dianna loves her grown up bathroom and I love having my life back.

Inventory Used: latex paint and Stain and Seal

Snowballs: Where they come from and how to avoid getting hit

blank canvasWorking as a decorative paint contractor for 14 years gave me the opportunity to observe snowballs and their victims up close and personal many times. Snowball victims almost always survive but they don’t get away completely unscathed. They walk around with that shocked, “How did I get here?,” look on their face. The photo above shows my daughter’s bathroom right before I got hit.

To be fair, I believe it’s my fault we got hit. This project was supposed to only involve a change in the wall color…….and then we went to Lowe’s. I found a flooring product that I liked and could afford at under $50 for the whole room. I thought it was a smart purchase.

The next day my husband’s told me he had made his own smart purchase when he said, “I ordered a new toilet. I figure if you’re going to replace the floor, we might as well upgrade the toilet.” The purchase of a new Assmaster 2000 let me know……..the snowball is now rolling.

removing the backsplashThe next shove came when he walked in on me trying to paint around the mirror. He offered to pull it off to make it easier. That was the critical error. When the mirror came off and he looked at the backsplash he realized it probably wouldn’t take that much work to remove both the tile and the counter. My daughter had requested that whenever we decided to replace the counter, could we raise the counter height to an adult height. This bathroom was created for children and the height is 3 inches lower than a standard counter. We had planned on replacing the counter sometime this year, but yesterday it became sometime this week. The snowball is rolling quickly now.

countertop removalMy husband is amazing and what would have taken me a couple days and a few trips to the chiropractor took him less than a couple hours. So now we have to replace the countertop, the backsplash, and while we’re at it, have the giant mirror cut and put in to two frames to make it prettier. The snowball is flying now.

raising the cabinetFortunately we had the perfect boards to raise the cabinet. This simple effort created an even bigger snowball because I will have to add a piece of wood at the bottom to cover the gap and since this was painted by the builder and I don’t have that color I’ll have to paint the cabinet. I hate painting cabinets. Fu*#king snowball!

wood countertopI decided that the cheapest and quickest way to put in a new counter would be to use a nice piece of wood. I’ll stain it and put on a really good top coat. I’m going to make the backsplash out of wood as well but I’ll add some decorative detail to it.

So what started as a small paint job has snowballed into a complete remodel including new floors, a new toilet, new mirrors, a new countertop and back splash and a freshly painted cabinet. Huge snowball.

How do you avoid snowballs?

Don’t touch the floor!

One Year Anniversary – Stash Inventory Update

Paint Stash 2013

From three shelves down to two

I’m a few days late, but I just finished taking inventory of my paint Stash. The One Year Anniversary of this blog is July 4th and I had intended to do my inventory in a timely fashion like the compulsive person that I am. Two things ended up pulling me away from achieving my goal. One: my husband decided at 10 am, on the Fourth, that we should have my family over for barbecue. Great idea, and totally fun, but that shouldn’t have taken me all day and I should have been able to get the inventory done. The nail in my coffin was that AMC started a Walking Dead Marathon at 10 am. Seriously, they’re killin’ me!

my obsession

How am I supposed to walk away from this? Dried up paint and plaster can not compete with this! The inventory took me a couple days to complete, in between commercials, it’s pathetic. Ask my family……if I’m into something that’s on tv, I’m completely paralyzed and I lose my ability to hear. Couple that with dead people and forget about it, my ass is glued to the couch and you no longer exist.  It doesn’t matter that I’ve seen it thirty times either. If they ever find me dead in my home, there was probably a really good movie on and I didn’t hear the smoke detector. At least I died doing what I love.

……..anyway….

leftover paintThis blog was created to document my attempt to get rid of my large stash of paint, left over from my days as a decorative paint contractor, all before my husband and I move in a year. This is the halfway point for me. One year down, one year to go. This is the load of empty and rotten cans that went to the hazardous waste facility this morning after I finished my inventory.

It’s important to check your paint stock every year to check whether or not the products are still worth keeping. Regardless of when you bought them, the paint may no longer be usable. Sometimes you don’t close them completely or the container fails or something contaminates them and makes them rotten or solidifies them. The only way to check is to actually open them and stir them. Just listening for liquid isn’t good enough. I’ve opened fairly new paint that sounds liquid and good only to find a hard shell with oil on top and a lot of hard paint underneath. Sometimes you open the can and so much rust has built up on the lid and fallen in the paint and there isn’t enough good product to strain out. Always take your leftover cans to a hazardous waste facility. Please don’t even dream about putting this stuff in the trash. I think you go to a special place in Hell for that. Paint Hell.

The Stash page has been updated with the reduced inventory list. A lot of the oil-base stains had become rotten. Oil-base stains usually last well, but if the lid gets compromised or if the product gets contaminated it hardens like a rock. Many rocks unearthed today. It’s sad that I didn’t use them, but at least my goal is a little closer. I’m considering holding an event in the fall to give away products I can’t find a use for, stay tuned for that. Let me know if you’re local and want to be invited.

That’s enough chit chat…….I gotta get back to the marathon!

Are you The Queen of Washi Tape?

Washi tape cabinetWashi tape is all the rage right now and if you haven’t bought a roll to play with I’d like to know what you’re doing with your time. Seriously! Washi tape is almost like post-it tape on a roll. You can tape something up with it, pull it off and it doesn’t harm the surface.

Washi Tape mural

Washi tape mural

The mural above was made using washi tape and when Rosa gets tired of it she can pull it down without leaving a trace of tape behind it. Great if you’re renting or in a dorm.

washi tape inspiration

washi tape inspiration

As you can see, the ideas are endless and the craft companies are coming out with new tape designs every day. I’ve even seen people striping their walls with the stuff, which totally beats painting stripes, striping with paint totally sucks.

washi tape storage

In response to the need to contain a person’s obsession, I created this washi tape cabinet.

salvaged wine boxI found this box at a yard sale. I’m guessing it was a wine box, based on it’s size and the imprinted graphic.

drilling holes for dowelsI drilled four holes on each side, big enough to insert four wood dowels. Easy peasy. Next I embellished it a little.

washi tape rackOkay, so I embellished it a lot. I wallpapered the insides with this cool grey, green and copper paper, painted the side a matching green, painted the dowels copper (Royal Design Studio Copper Stencil Creme), and glazed the whole box.

The collage on the front was a ton of fun to do. I painted in the castle, added a Queen, some flowers and two angels flying with bouquets of hydrangeas. Perfect.

lots of washi tapeThis cabinet can hold 80 standard washi tape rolls. Can you even imagine?! Now, obviously, I am not The Queen of Washi Tape. This is all the tape that my daughter and I own, and to be honest, we went out and bought a few more just so this photo didn’t look pathetic (that’s the kind of sacrifice I’m willing to make for my art). But for a serious taper (not a tapir, they don’t have thumbs, just hooves) this cabinet would give them the ability to not only contain their collection, but also add to it. Nirvana!

This was a really fun piece to make and I love how it came out. If you think you might be the Queen, or know someone who is, the cabinet is for sale in my Etsy Shop now.

Inventory used: acrylic craft paints, Stain & Seal

A place to keep your craft

craft supply organizerCraft supplies tend to reproduce if you don’t watch them carefully. This blog was created as a result of paint procreation that I allowed to get out of hand. Unfortunately, my hoard is not limited to paint. It also includes fabric, ribbon, paper ephemera and recently I’ve noticed that my washi tape collection is multiplying.

I know I’m not the only girl out there with this problem, so I decided to make some wall organizers that address the specific needs of crafters. This piece is the first of four organizers I’m building to help prevent craft overload.

washi tape rackThe left side of this organizer has two small wooden tea crates that are perfect for holding stickers, small scrapbook pads and SMASH book pads. They could also hold markers and pencils.

Beneath them is a washi tape holder I made from a little box I picked up at an estate sale. The dowel is removable so you can add or subtract rolls as needed. It will hold at least a dozen rolls which is more than any one person should have (at least one normal person….I’m not talking about tape hoarders).

mail organizerThe right side of the organizer has a medium size mail holder that I made from an old speedreading text book. The lining was made from a vintage cotton fabric and the book is decorated with black felt ribbon and two flocked resin roses. It hangs from two s-hooks hanging from two vintage drawer pulls. It’s the perfect size for journals or sewing patterns.

Along the bottom of the piece is a galvanized steel shelf that I made from whatever the heck this thing is……..I have no idea. It’s really sturdy and the perfect size for craft paints, glue and bottles of glitter.

On either side of the shelf are two wrought iron hooks I bought at Kobey’s swap meet. They look rusted, but I sprayed a clear topcoat on them so the rust won’t rub off on to anything.

art supply organizerAround the top section I’ve attached an old metal folding ruler, just because it looks cool. All the wood moldings are salvaged, but the paint finishes are new.

It’s a great little piece and I’m really happy with how it came out. It would look great in a craft room or above a childs’ art space. It’s available in my Etsy shop now.

One down, three more to go!

Inventory used: latex paint, craft paint, Stain & Seal

Organizing Beautifully

mail organizerI’ve recently sold five of my Message Center boards and my Salvaged Sanity shop was looking kind of empty. So after working outside for a week on my new bench, I’m back in the studio working on boards.

This is my latest Mail Organizer which is designed to keep things organized in a kitchen or office.

mail holder and corkboardThe left side of the board has a large mail holder made out of a book. It’s lined with a dark olive cotton and embellished with felt ribbon, and some metal filigree. Below this hangs three metal cups that are perfect for holding paper clips, rubber bands or spare change.

chalk board and mail holderThe center panel has a hand made wooden tray that I’ve fashioned in to a fabric covered corkboard, with fabric covered button tacks and a chalkboard with a cute little silver cup to hold the chalk.

The left side has a smaller mail holder, two hand made wrought iron hooks (found the maker at the Kobey swap meet) and a pencil holder that I made from some type of cup (I’m sure one of you Boy Scouts out there can tell me what this is).

message centerAll the moldings on the back are salvaged from estate sales and salvage yards, but I put new stains and painted finishes on them to make them prettier. I’m in love with how it came together.

All my boards are available in the Salvaged Sanity Etsy shop, so please check it out.

Inventory used: latex paint, Stain & Seal

Let’s Get Personal

Salvaged Sanity StudioIt’s obvious to anyone that enters my studio that I believe personalizing your space is absolutely necessary. This is the wall in front of my main workstation. The walls are plastered and painted with my own interpretation of Van Gogh’s Almond Blossom Trees and all the hanging items are pieces connected to my late mother. It’s definitely MY room.

salvaged wood study spotWhen I made over my daughter’s study spot we put little bits of her everywhere and she loves it. That project prompted me in my next venture which is making message centers from salvaged wood, old books and flea market finds.

cottage chic organizerI love making them, but I’ve been getting requests to buy components of the boards separately. Ask and you shall receive:

build-your-own mail organizerI have created blank message center boards that are ready to be personalized.

message center boardI haven’t made them completely blank. Like the one above this one has a cork board and two hooks besides the two 3-ring binder spines.

message center boardThis one has two knobs as well and three magnet bars with bottle cap magnets. Each of these have two binder spines which can hold two mail holders, or six hanging frames or note pads, or a mix of all of these. The possibilities are endless.

Now you just need a few pretty accessories……

large mail holdersmall mail holdersmall mail holderlarge mail holdersmall mail holderjournal-holderEach of them are a little different. I wanted to make something for everyone. These are just a start. I’ll be making more of everything but also hanging frames, notepads and anything that you request. If there’s something missing on these boards that you wish they had, please tell me. I really want to know.

These can all be viewed on my Etsy shop. There you’ll also see more photos and all the details on each item. I’m just so excited to be able to show them off.

Inventory used: Stain & Seal and latex paint

Look At My Box!

mini dresserThis little beauty was one of the things I snagged when I was helping my friend go through an overwhelming amount of stuff left at her grandparent’s home. Honestly, I didn’t know what I was going to do with it, but Saturday I had a brilliant idea that I could make this little dresser help me organize all the hardware I’ve been accumulating.

Since I planned to use Stain & Seal to refinish it I just scrubbed it real good and removed all the hardware. Stain & Seal is a product from Faux Effects International that looks and works like a stain, in that it’s transparent and can be thinned with another Faux Effects product called FX Thinner which gives you more open time, like a glaze. What I love about the product is that it sticks to almost anything and when it dries it has a nice sheen like a varnish, so you don’t have to varnish it (Get it….. Stain and Seal). You can top coat the piece if it’s going to get a lot of wear, but for the most part, like on a piece like this, you can just leave it as is. Seriously, I washed it, applied two coats and I was done!

painted hardware organizer

Isn’t it adorable?! I replaced the knobs with little wood beads and screws and I replaced the original handle with a cool old aluminum one I had scavenged somewhere. The two colors of Stain & Seal I used were Teal and Rich Brown, in case you were wondering.

drawer organizersI cut scrapbook paper to fit in the bottom of each drawer, just to make it pretty, and then I jammed in these plastic inserts that will help me sort all my screws, hooks and nails. I think the plastic dividers came from a box of mochi ice cream. I had saved them because I thought they would make good paint palettes (not cuz I’m a hoarder, cuz I’m not). I had enough of them for three drawers, which I think is enough. If it’s not enough I’ll just have to eat another box of ice cream. Dang!

So anyway, there’s my two-hour makeover on my booty box. (Booty as in, Pirate’s Booty………not as in, “I wish Johnny Depp would give me a booty call.”)

Inventory Used: Stain & Seal

Going Public

Salvaged Sanity on Etsy

I just went back through my posts and found it’s been over a month since I posted anything that I’ve actually painted. And like I said a few weeks ago, it’s not that I haven’t been painting, it’s that I haven’t been ready to share what I’m painting. Now I feel I’m finally ready to show you what I’ve been doing. So here goes…….
handmade mail organizerI have been making wall mounted organizers. This idea came about after I finished the makeover on my daughter’s study spot. I had so much fun doing that. I loved shopping for all the salvaged wood, old drawers and hardware, but I really had fun piecing it all together. It was like a big jigsaw puzzle.

Two things pushed me to the idea of turning that project into something portable. First was my brother saying over and over again, “I just know someone would pay you to do this in their house.” He has always been one of my biggest fans. The problem with that idea was that I’m completely burned out on working for people as I mentioned in one of my earliest posts. So I started to think about how I could make a portable paneled piece that had the same flavor as my daughter’s wall.

The next thing that pushed the idea was a stash that I haven’t disclosed on my blog before. A few years back I had an idea to make binders out of old books.

salvaged book bindersI got really old books, gutted them, installed a 3-ring binder spine and sold them as binders. I absolutely loved making them, but I had a problem finding the spines. I tried removing them from old binders but often the spine got twisted when I removed them and wouldn’t close right afterward. So I found a company that sold just the spines. Problem was, they only sold in bulk so I had to buy 100 of them. It was soon after that purchase that I realized it was really hard to find the books in the right size.

Since then I have had 95 binder spines sitting in boxes and nothing to do with them. I also had a couple large books in my studio that hadn’t been the right size for a binder, but I figured out that if I turned them sideways and lined them with a fabric pouch, they could be a great catchall. These organizers are the result of those two ideas.

hanging mail holderThis organizer features a small book pouch and a triple frame that both hang from the 3-ring binder spine. The spine opens so that the accessories can be removed and exchanged if desired. I’ve put pictures in the frames, but obviously they could be customized with your own photos.

dry erase boardThere are three hooks under the book for keys. I turned the yellow frame into a dry erase wipe board and added vintage fabric under the glass. The cigar box on the right is a great little cubby for pens, stamps or business cards. The paper covered box inside can be removed. The denim covered bars on the bottom are magnet bars and the bottle caps are magnets.

handmade mail centerNearly everything on the board has been salvaged but the painted finishes are new and built to last. I can see this being hung in a kitchen, home office or entry way. The wall organizer is ready to be hung with sturdy D-rings at the top.

I have a new Etsy shop just for these pieces so please check it out. I’m also building a website and will add links to that as soon as it’s complete. Over the next week I’ll be introducing new pieces and I hope you’ll give me feedback on them.

This blog was started as a recording of a two year destash, but I had also hoped I would find a new passion for painting. I’m absolutely in love with this idea and I hope you will be too. Please feel free to share this with friends….I need all the feedback I can get.

Inventory used: latex paint, Stain and Seal